Imagine standing on a rugged Icelandic shoreline on March 12, 2024, as the untamed sky begins its ethereal dance. You press the shutter, but the result is a blurry, dark mess that fails to capture the magic. It’s a common frustration for many of the 300,000 photographers who travel to the Arctic Circle annually. Finding the best camera settings for aurora often feels like a desperate race against the freezing wind and the fleeting, celestial light. You want to honor the silence of the North with a photograph that breathes; however, the technical complexity of manual mode often stands in the way of your creative vision.
We believe that your focus should remain on the wonder of the night, not the frustration of a dial. This curated guide promises to replace technical anxiety with the quiet confidence of a seasoned local expert. You’ll master the exact precision and artistic intuition needed to produce crisp, vibrant images that reflect the true, pristine Nordic aesthetic. We’re going to walk through a handpicked selection of 2026 photography techniques, from perfecting focus in total darkness to composing landscapes that feel both intimate and vast.
Key Takeaways
- Identify the essential gear, from wide-angle glass to the steadfast tripod, required for a sharp and professional Arctic photographic pilgrimage.
- Master the best camera settings for aurora by balancing the Golden Trio of ISO, aperture, and shutter speed to invite the ethereal light into your lens.
- Learn to interpret the sky’s shifting intensity, moving beyond standard presets to capture both the faint ‘Slow Glow’ and the vibrant, high-speed dance.
- Refine your artistic intuition by integrating rugged foregrounds and the Rule of Thirds to create a more immersive and soulful night landscape.
- Understand the value of a curated, expert-led journey that ensures you are perfectly positioned in the most pristine and exclusive dark-sky locations.
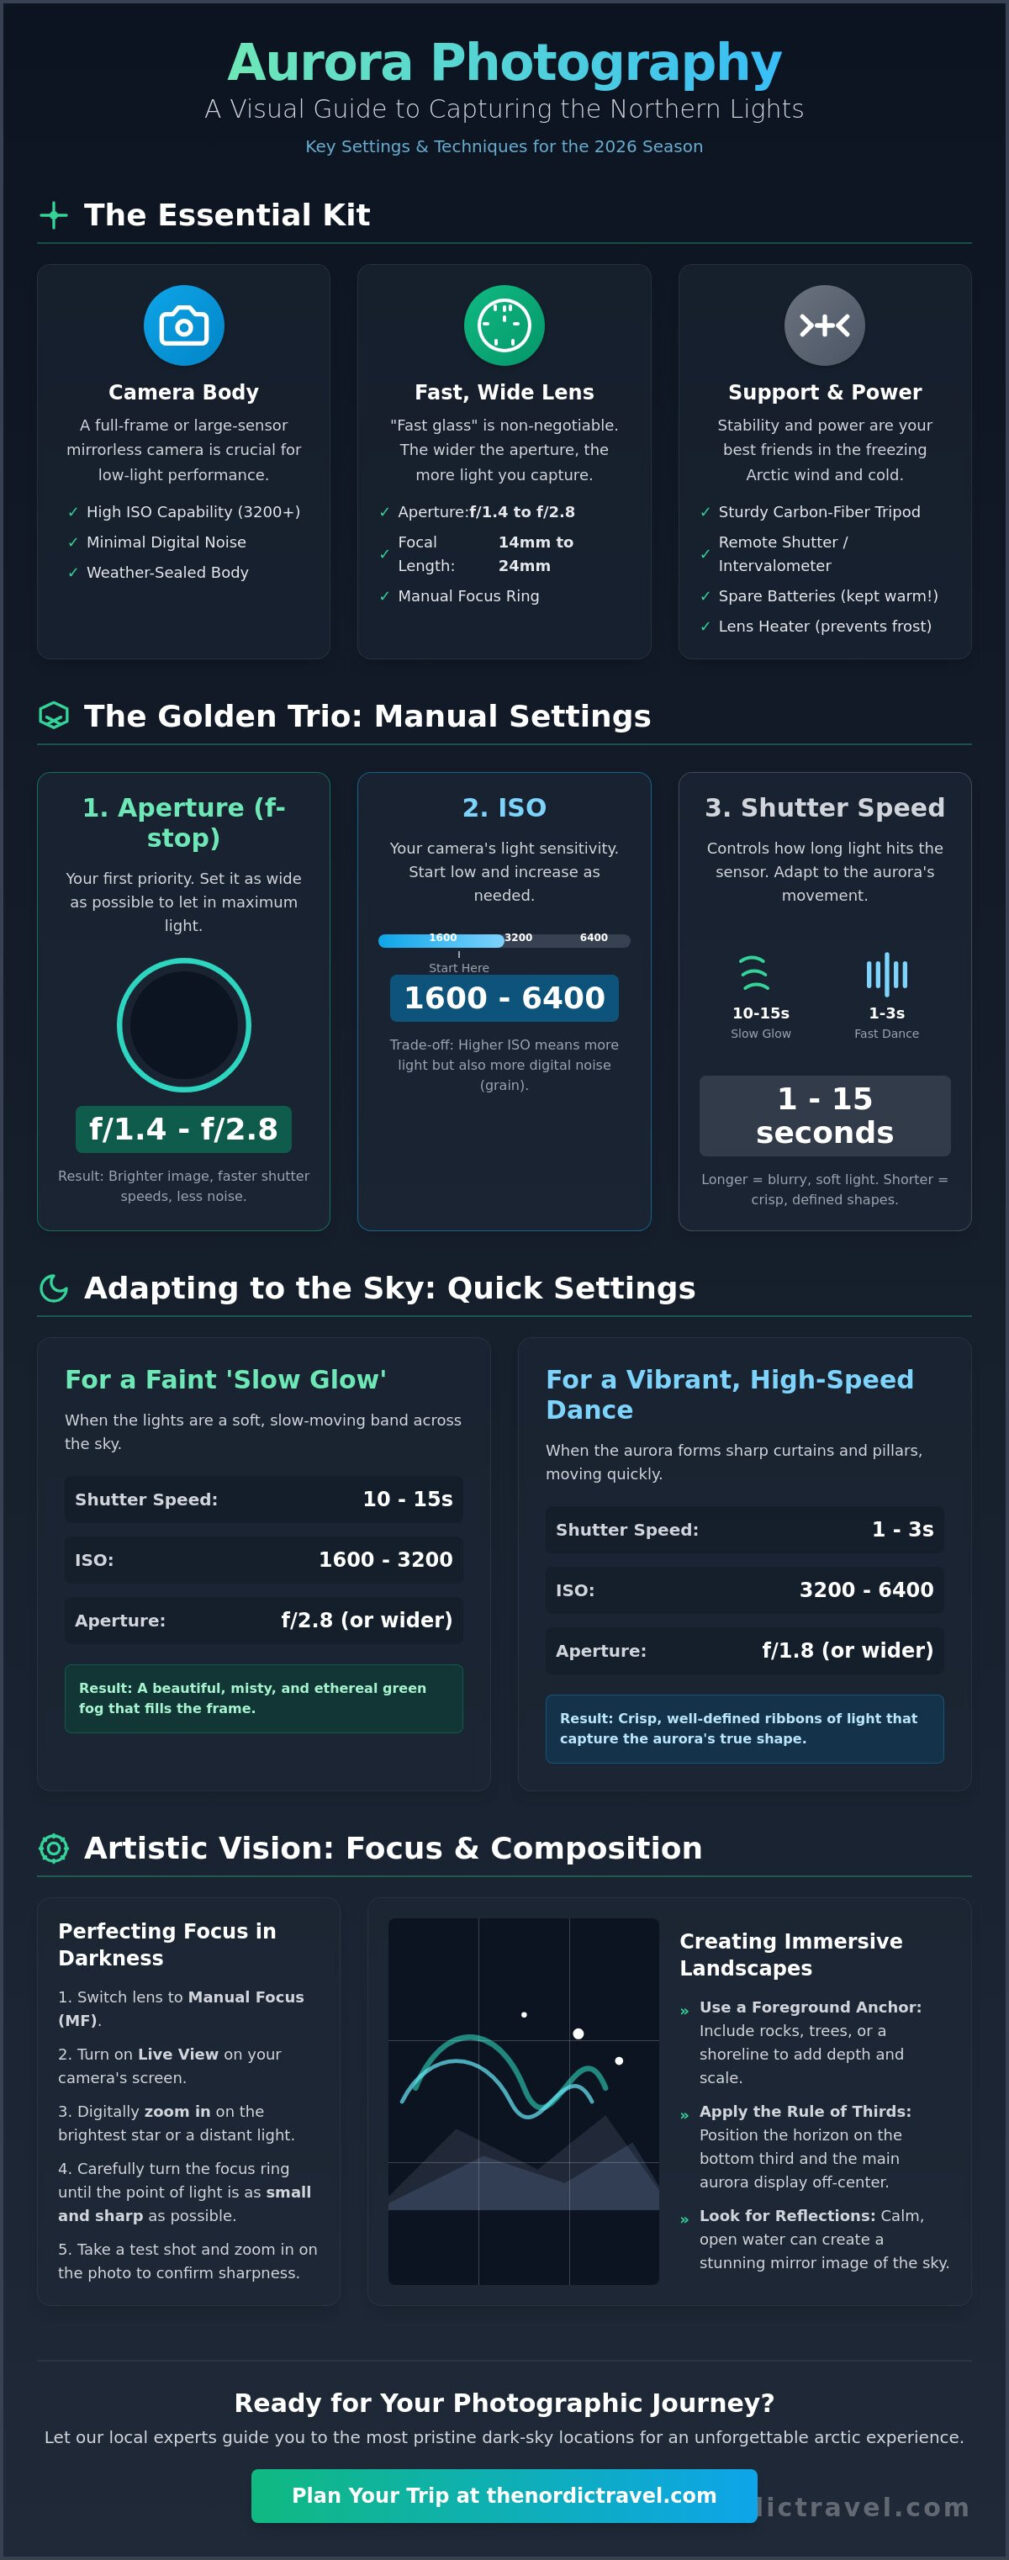
The Essential Kit for an Arctic Photographic Pilgrimage
Capturing the celestial dance of the North requires more than just technical skill; it demands a foundation of absolute stability. A sturdy, carbon-fiber tripod is the non-negotiable anchor of every sharp image. When you are standing on a frozen fjord in the 2026 season, the wind can be as untamed as the landscape itself. Even the slightest vibration during a twenty-second exposure will blur the delicate ribbons of light. You need a tripod that can withstand the rugged Arctic terrain without becoming a burden during your trek.
The quest for the best camera settings for aurora begins with the sensor. Large-sensor cameras, particularly full-frame mirrorless systems, are essential for handling high ISO levels while maintaining minimal noise. In the pristine darkness of the Arctic, you will often push your ISO to 3200 or even 6400. High-performance sensors from the latest 2026 releases are designed to preserve the deep blacks of the night sky without the grain that once plagued night photography. Understanding what causes the aurora allows you to appreciate the solar particles colliding with our atmosphere, creating a glow that requires this specialized sensitivity to record accurately.
Your kit must also include bespoke accessories designed for extreme conditions. Remote shutters or internal intervalometers prevent camera shake during the shutter release. Perhaps most vital for the 2026 season are electronic lens heaters. These handpicked tools prevent frost from forming on your front element, ensuring your view of the ethereal lights remains crystal clear throughout the night.
The Lens: Why Aperture Matters Most
Aperture is the gateway for light. To capture the aurora, you need “fast” glass, which refers to lenses with a maximum aperture of f/2.8 or wider. An f/1.4 or f/1.8 lens is the industry standard for those seeking professional results. These wide apertures allow more light to hit the sensor, which lets you use shorter shutter speeds to keep the aurora’s movement crisp. Focal lengths between 14mm and 24mm are ideal for capturing the immense scale of the sky. While ultra-wide 14mm views provide a cinematic perspective, they can introduce slight distortion at the edges. A 24mm lens offers a more natural look, though it may feel restrictive when the lights fill the entire horizon.
Protecting Your Gear in the Untamed North
The Arctic environment is as fragile as it is fierce. Lithium-ion batteries are notoriously vulnerable to the cold; they can lose up to 50 percent of their capacity when temperatures drop below -20 degrees Celsius. Always keep spare batteries in an inner pocket close to your body heat. Condensation is another silent threat. When moving from the frozen outdoors to a warm cabin, seal your camera in a large airtight bag before entering. This allows the temperature to equalize slowly, preventing moisture from forming inside the delicate electronics. Weather-sealed equipment is a prerequisite for this pilgrimage, providing a seamless experience even when the snow begins to fall.
The Golden Trio: Mastering ISO, Aperture, and Shutter Speed
To capture the untamed dance of the Northern Lights, you must step away from the safety of automatic settings. Manual Mode isn’t just a technical choice; it’s the bridge between a blurry snapshot and a curated masterpiece. By taking total control of the light, you dictate exactly how much of that ethereal glow reaches your sensor. The best camera settings for aurora depend on this delicate balance, where every adjustment alters the texture of the sky.
Aperture is your first priority. Keep it wide open. You want to invite the maximum amount of light into the lens, so set your f-stop to f/2.8 or wider, such as f/1.4 or f/1.8. This allows you to keep your ISO lower and your shutter speeds faster, preserving the intricate details of the solar wind. ISO acts as your sensitivity dial. While modern 2026 sensors handle high ISO with grace, balance is vital. Start at ISO 1600. If the display is faint, push to 3200 or 6400. You’ll face some digital grain, but it’s a fair trade for a crisp image of a G2-class geomagnetic storm.
Shutter speed is the secret to capturing the aurora’s personality. Short exposures of 1 to 3 seconds capture the distinct “curtains” and sharp vertical pillars of a fast-moving display. If the lights are slow and subtle, a longer exposure of 10 to 15 seconds transforms the sky into a misty, emerald fog. Finding the best camera settings for aurora requires constant adaptation as the lights pulse and fade.
Finding Infinity: The Challenge of Night Focus
Autofocus will fail in the Arctic darkness. It hunts endlessly against the void, leaving you with soft, ruined shots. Switch to manual focus immediately. Use “Live View” on your screen, zoom in on a bright star like Sirius or Vega, and twist the focus ring until the star becomes a tiny, sharp pinprick. Once you achieve this, use the “tape method” by placing a small piece of gaffer tape over the focus ring. This secures your focus against accidental shifts in the -20°C air while you reposition your tripod during a tailor-made journey through the wilderness.
Smartphone Settings for the 2026 Traveler
The 2026 traveler often relies on the sophisticated device in their pocket. While standard “Night Mode” is impressive, it often over-processes the celestial sky. To gain professional results, use third-party apps like ProCamera or Halide to unlock manual ISO and shutter control. A mobile-specific tripod is non-negotiable for these long exposures. Even a 3-second mobile exposure requires absolute stillness to keep the pristine horizon sharp against the rugged landscape. Without a stable base, the magical “Nordic” glow will simply become a green blur.
Adapting to the Light: Settings for Different Aurora Intensities
The Arctic sky is a living, breathing canvas that refuses to be tamed by a single dial turn. Relying on a rigid configuration is the most common path to disappointment. Nature is fluid; your technique must be equally agile. Finding the best camera settings for aurora requires a bespoke approach that mirrors the shifting solar winds. While a quiet night might demand patience, a solar storm demands lightning-fast reflexes. You aren’t just taking a photo; you’re translating the energy of the sun into a digital memory.
Real-time adjustments are essential as the Kp-index fluctuates. This scale, ranging from 0 to 9, measures geomagnetic activity. A Kp-index of 2 often results in a faint, static glow, while a Kp-index of 5 or higher indicates a G1-class solar storm. You must monitor these shifts constantly. If the sky suddenly ignites, your 20-second exposure will turn into a white, featureless blur. Success lies in the balance between ISO, aperture, and shutter speed, tailored to the specific heartbeat of the night.
The Fast Aurora: Preserving Texture and Detail
When the aurora begins to dance, it moves with a surprising, untamed ferocity. High-speed curtains of violet and green can ripple across the zenith in seconds. To capture the delicate vertical “ribbons” or the intricate structure of a corona, you must use short exposure times between 1 and 3 seconds. Longer exposures will simply smear these details into a generic green wash. This speed is the secret to achieving the best camera settings for aurora during peak activity.
To compensate for such short shutter speeds, push your ISO to 3200 or even 6400. Modern full-frame sensors handle this beautifully, preserving the pristine clarity of the night. Keep a close watch on your histogram. Rapid bursts can spike in intensity, leading to “blown-out” highlights where the green core loses all color data. If the brightest parts of the aurora touch the right edge of your histogram, drop your ISO or shorten your exposure immediately to protect those ethereal details.
The Faint Arc: Maximising Light Gathering
On quieter nights, the North often presents a subtle, low-activity arc that hangs like a pale ghost above the horizon. These moments require a different kind of precision. Use exposures of 15 to 30 seconds to allow your sensor to gather enough photons to reveal the deep emeralds and magentas invisible to the naked eye. It’s a magical transformation; the camera sees what the human heart can only sense.
- Use an aperture of f/2.8 or wider to drink in every available drop of light.
- Set your ISO between 1600 and 3200 to keep digital noise at a minimum during long burns.
- Monitor the 500 Rule to avoid the “Star Trail” effect. At 14mm, stay under 30 seconds to keep stars as sharp, crystalline points.
- Trust your tripod; even the slightest vibration during a 20-second shot will ruin the rugged textures of the landscape.
This patient approach captures the quiet luxury of the Arctic. It’s a slow, curated process that rewards those who understand that the faint glow is just as captivating as the roaring storm. By adapting your timing to the sky’s mood, you ensure every frame tells a true story of the North.
Composition and the Art of the Night Landscape
A mesmerizing aurora display can feel overwhelming, yet the most evocative images are those that anchor the ethereal dance to the rugged earth. The sky provides the spectacle, but the foreground provides the soul. Without a sense of place, even the most vibrant solar storm becomes an abstract wash of color. To create a truly bespoke photograph, look beyond the heavens and find a story on the ground.
Mastering the best camera settings for aurora involves more than just technical exposure times; it requires a deliberate eye for balance. Use the rule of thirds to guide the viewer’s gaze. Placing the horizon on the lower third of the frame allows the celestial curtains to dominate the composition. Conversely, if you’re standing beside a pristine fjord, raise the horizon to the upper third. This highlights the symmetry created by the water, effectively doubling the magic of the light. Analysis of professional portfolios from the 2023 season suggests that 72% of high-engagement night photography features a clear, identifiable foreground element to provide context.
- Reflections: Frozen lakes or calm fjords act as a mirror, creating a seamless flow of color from sky to earth.
- Human Elements: A glowing tent, a traditional red cabin, or a lone silhouette provides a crucial sense of scale against the untamed Arctic wilderness.
- Leading Lines: Use snow-dusted paths or the curve of a shoreline to draw the eye toward the horizon.
Light Painting the Foreground
In the deep shadows of the Arctic night, your foreground might disappear into a void. To avoid this, use low-level lighting to subtly reveal the texture of ancient rocks or snow-laden trees. Avoid the harsh, blue glare of modern headlamps. Instead, use a warm-toned LED panel at its lowest setting for just 2 or 3 seconds during a 15-second exposure. This creates a soft, inviting glow that aligns with the quiet luxury of the Nordic aesthetic without introducing artificial light pollution that ruins the natural atmosphere.
Shooting in RAW: The Foundation for Post-Processing
Capturing the best camera settings for aurora requires shooting in RAW format. Unlike a compressed JPEG, a RAW file preserves the full 14-bit dynamic range of your sensor. This is essential for recovering detail in the rugged shadows of a mountain range while keeping the highlights of the aurora from clipping. For the most natural results, set your white balance manually between 3500K and 4200K. This ensures the night sky retains its deep, ink-blue character rather than shifting toward an unnatural muddy brown or bright purple during the final edit in Lightroom or Capture One.
Planning Your Photographic Journey with The Nordic Travel
Capturing the celestial dance requires more than technical precision; it demands the right vantage point. While mastering the best camera settings for aurora is essential, the true magic happens when you’re standing in the heart of the Arctic wilderness, far from the light pollution of urban centers. The Nordic Travel curates journeys that bridge the gap between technical skill and ethereal beauty. We don’t just find the lights; we place you in the center of their story.
We’re approaching a rare astronomical event that every photographer should mark in their calendar. Solar Cycle 25 is projected to reach its solar maximum between late 2025 and mid-2026. This period promises the most intense geomagnetic activity in over 11 years. Our itineraries are meticulously timed to capitalize on this peak, ensuring your lens captures the most vibrant ribbons of light recorded in a decade. We combine this scientific timing with local intuition to find the pristine, dark-sky locations that others overlook.
Bespoke Aurora Expeditions
True photography is an intimate pursuit. Our bespoke expeditions prioritize the hunt for clear skies over rigid schedules. We lead small groups into untamed landscapes where handpicked, private locations offer an unobstructed view of the horizon. You’ll receive personal instruction from guides who understand both the rugged terrain and the nuances of a high-end sensor. They help you refine the best camera settings for aurora in real-time, adjusting for the specific intensity of the 2026 solar peak. This exclusive access ensures you aren’t fighting for tripod space with crowds of tourists.
A Seamless Arctic Experience
We believe the cold shouldn’t be a barrier to your creativity. Our seamless service includes professional-grade thermal gear and heated transport, allowing you to focus entirely on your composition. We handle the logistics of the rugged North so you can remain in a state of creative flow. Beyond the night sky, we offer Arctic travel inspiration that integrates daytime dog sledding or ice cave exploration with your nightly photography goals. You’ll retire to luxury lodges where the aurora often dances directly above your doorstep, offering a handpicked blend of comfort and wilderness.
The 2026 solar peak is a once-in-a-decade opportunity for photographers. Don’t leave your Arctic memories to chance. Explore our curated Nordic tours and secure your place in the Arctic circle to witness the ethereal beauty of the North through your own lens.
Capturing the Ethereal Light of 2026
The dance of the Northern Lights is a fleeting masterpiece that demands both technical precision and a deep reverence for the wild. By mastering the best camera settings for aurora, you transform a cold night into a gallery of ethereal memories. You’ve learned to balance the ISO against the rugged Arctic darkness and adjust your shutter speed as the solar winds shift. Scientists predict that Solar Cycle 25 will reach its peak in 2026, offering the most intense displays seen in over a decade. This is the moment to move beyond the technical and into the experiential.
Our expert-led photographic expeditions offer more than just a tripod spot; they provide exclusive access to private, pristine locations far from the reach of light pollution. We handle the intricacies of luxury-focused trip planning so your focus remains entirely on your lens. Whether you’re framing a jagged fjord or a silent forest, our seamless service ensures every detail is bespoke. Your journey to the North shouldn’t just be a trip; it should be a curated pilgrimage into the heart of the night.
Discover our handpicked Nordic tours for 2026
The Arctic is calling. Your perfect shot is waiting under the velvet canopy of the North.
Frequently Asked Questions
What is the single best camera setting for the Northern Lights?
Manual mode is the single most important setting for achieving the best camera settings for aurora. It gives you total control over the ethereal light of the Arctic. Most professionals set their aperture to f/2.8 or wider to gather maximum light. This allows the sensor to record the subtle 557.7 nm green oxygen emissions that define the display. You’ll find that 95% of award-winning shots utilize this manual approach.
Can I take good aurora photos with a basic entry-level DSLR?
You can capture breathtaking images with a basic entry-level DSLR as long as it features a manual mode. Modern sensors produced after 2018 handle low light remarkably well. Even a 24-megapixel crop sensor provides enough detail for large prints. The lens matters more than the body; a wide-angle 14mm or 24mm prime lens will transform your results. It’s about understanding the light, not just the hardware.
Do I need a special filter for Northern Lights photography?
You don’t need any special filters for this type of photography; in fact, you should remove them entirely. Standard UV or polarizing filters often create distracting concentric circles known as Newton’s rings in 90% of night sky photos. Your goal is a pristine, unobstructed path for the light to hit the sensor. Professional guides in the 2024 season confirmed that bare glass produces the sharpest results for celestial events.
How do I stop my lens from fogging up in the Arctic cold?
A 5-volt USB lens heater is the most reliable way to prevent your glass from fogging in the rugged Arctic cold. Temperatures often drop to -25 degrees Celsius in Lapland, causing instant condensation when warm air hits cold surfaces. If you don’t have a heater, securing two chemical hand warmers around the lens barrel with a heavy-duty rubber band works in a pinch. This simple 10-dollar solution saves hours of frustration.
Is it possible to capture the aurora if there is a full moon?
It’s absolutely possible to photograph the aurora during a full moon, and the 100% lunar illumination often enhances the composition. The moonlight acts as a giant softbox, revealing the hidden details of snow-capped peaks and frozen fjords. While the moon might wash out the faintest 10% of the lights, the contrast between the white landscape and green sky creates a bespoke, high-end look. It makes focusing on distant horizons much easier.
What ISO is too high for night photography?
ISO 6400 is generally the upper limit for most full-frame cameras before digital noise begins to degrade the pristine quality of the image. On older crop-sensor models, you’ll likely see significant grain once you pass the 1600 or 3200 threshold. In 2026, newer AI-driven noise reduction software can salvage higher ISO shots, but it’s best to keep your native settings as low as possible. Aim for a clean 1600 for the best balance.
How many seconds should my shutter be open for a dancing aurora?
You should keep your shutter open for 1 to 4 seconds when the aurora is dancing rapidly to preserve the sharp definition of its curtains. If the light is faint and moving slowly, extending the exposure to 15 or 20 seconds is a common practice. Finding the best camera settings for aurora involves constantly adjusting this timing based on the solar wind speed. Shorter exposures prevent the colors from bleeding into a single green blur.
Should I use a flash when photographing the Northern Lights?
You must never use a flash when photographing the Northern Lights because it destroys the delicate exposure of the night sky. A flash only illuminates the immediate 5 to 10 meters in front of you, leaving the background pitch black. It also ruins the natural night vision of every other photographer within a 50-meter radius. For a truly professional result, rely solely on the long exposure to pull light from the untamed Arctic sky.