The greatest celestial light show in over a decade is approaching. In 2026, the Solar Maximum will set the Arctic sky ablaze with an intensity few have ever witnessed, yet most who travel to see it will return with little more than blurry, green-tinged disappointment.
We understand the feeling. You’ve journeyed to the edge of the world, stood in the pristine, silent cold, and watched the ethereal dance unfold above you. The pressure to capture that once-in-a-lifetime moment is immense, and the fear of your settings being wrong is a heavy weight. This guide is your antidote to that anxiety. It’s a curated masterclass designed to give you complete confidence, showing you exactly how to photograph northern lights with the technical precision of a professional and the heart of an artist.
From handpicked gear that withstands the rugged cold to the step-by-step manual settings for crisp, vibrant images, we’ll ensure the memories you bring home are as breathtaking as the ones you witness.
Key Takeaways
- Discover why the 2026 Solar Maximum presents a rare, once-in-a-decade opportunity to capture the most intense and frequent auroral displays.
- Master the technical blueprint for how to photograph northern lights, from selecting the right gear to balancing the critical manual settings for crisp, vibrant results.
- Learn the art of composition to move beyond a simple snapshot, weaving the ethereal aurora into the rugged landscape for a truly powerful image.
- Acquire essential field techniques for staying warm and protecting your sensitive camera equipment during long, cold nights under the Arctic sky.
The 2026 Solar Maximum: Why This is the Year of the Aurora
The cosmos is preparing a spectacle, a celestial performance decades in the making. Our sun breathes in a slow, rhythmic cycle, an 11-year journey from slumber to fury and back again. We are now ascending towards a grand peak of this cycle, the Solar Maximum, predicted to crest between 2025 and 2026. This is not merely an astronomical event; it is an exclusive invitation for photographers to witness the Aurora Borealis at its most magnificent.
The Solar Maximum is a period of intense solar activity. The sun’s surface becomes a canvas of violent sunspots and powerful solar flares, hurling vast clouds of charged particles into space. When this stellar wind collides with our planet’s magnetic field, it ignites the upper atmosphere. The science of what causes the aurora is fascinating, but the result is pure magic. During this 2026 peak, the displays will be more frequent, intensely vibrant, and will dance across skies much farther south than usual. This means prime viewing opportunities not just in the high Arctic, but potentially painting the horizons of southern Norway and the Swedish archipelago with ethereal light.
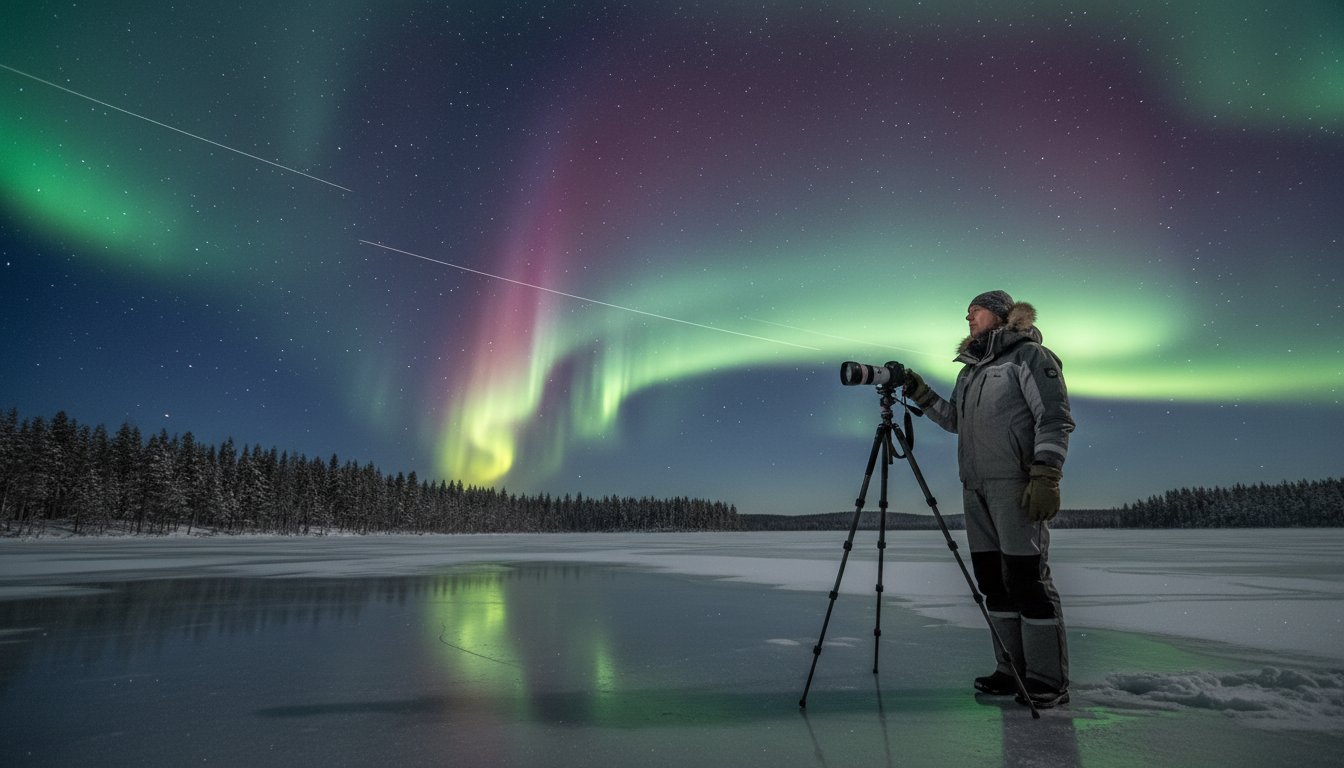
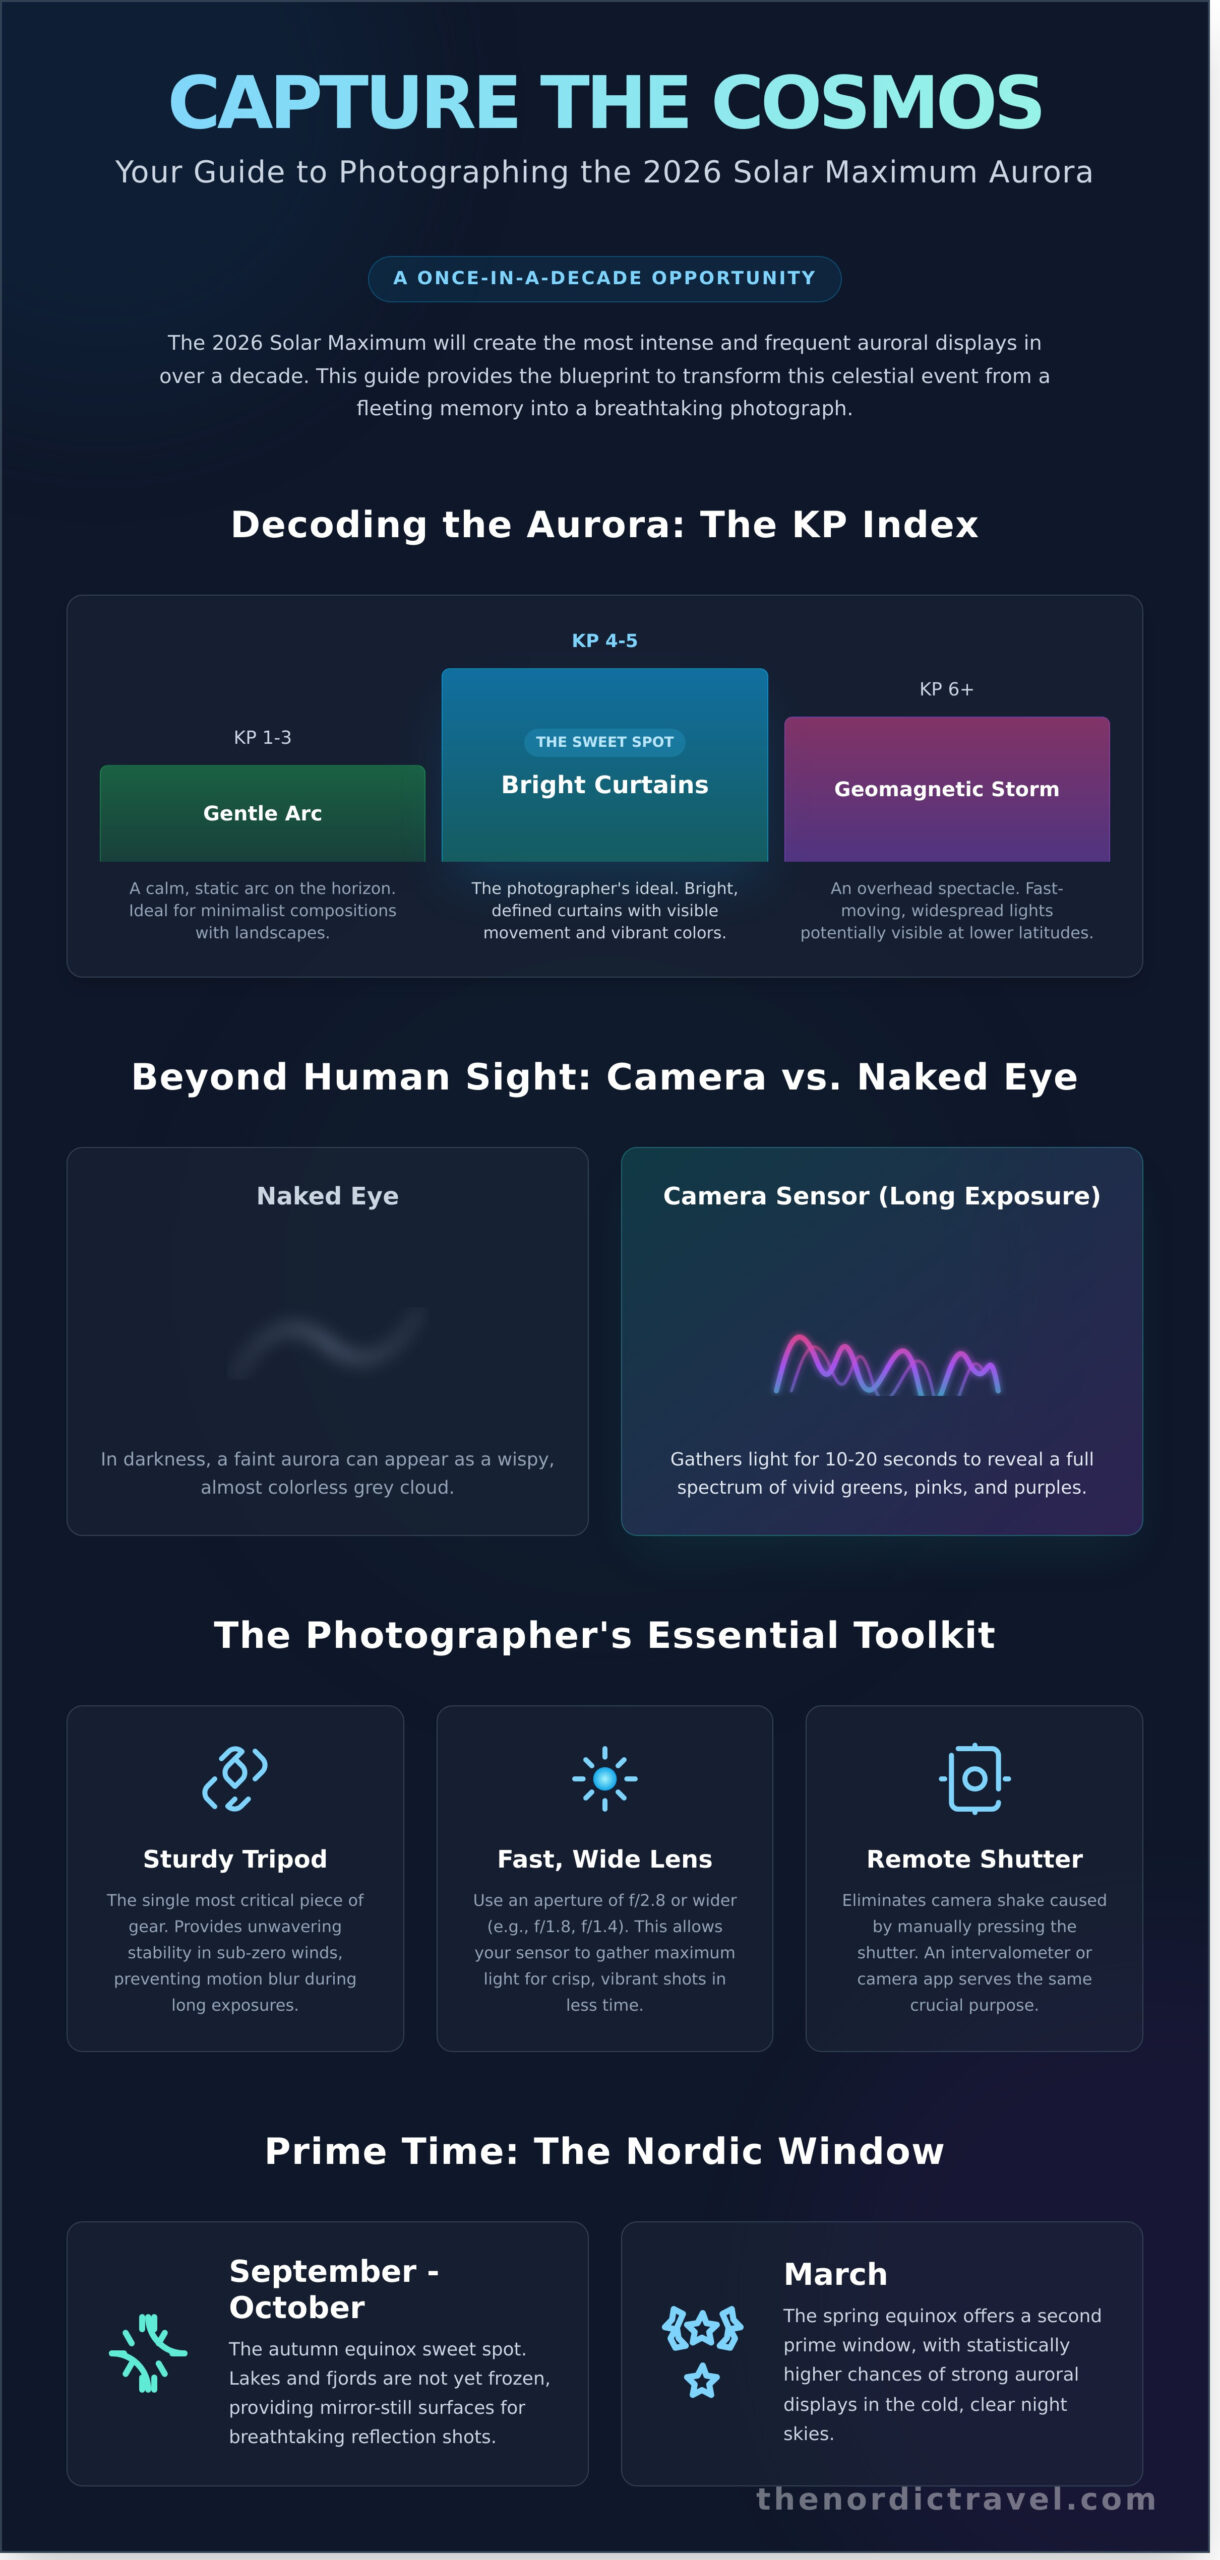
A crucial piece of wisdom for anyone learning how to photograph northern lights is understanding the difference between what your eyes perceive and what your camera sensor can capture. Your camera is your superpower. In the profound Nordic darkness, a faint aurora might appear to the naked eye as a wispy, greyish cloud. But through a long exposure, your camera gathers light for 10 to 20 seconds, revealing a tapestry of vivid greens, pulsating pinks, and deep purples that were there all along, just beyond our human perception. This peak period increases the chances of seeing these colours with the naked eye, but the camera will always hold the key to the full spectrum.
Predicting the Dance: KP Index and Solar Wind
The KP Index is the global scale of geomagnetic activity, ranging from 0 (calm) to 9 (extreme storm). For a photographer, this number translates directly to opportunity. While a KP of 2 or 3 can yield a beautiful, static green arc over the northern horizon, a KP of 5 or higher is when the sky truly erupts. The solar wind adds another layer; high speeds (over 500 km/s) are what create the coveted, fast-moving curtains of light that seem to twist and fold in on themselves. A lower speed might produce a more gentle, glowing haze.
- KP 1-3: A gentle arc on the horizon. Good for minimalist compositions.
- KP 4-5: The sweet spot. Bright, defined curtains with visible movement and colour.
- KP 6+: A geomagnetic storm. The lights are overhead, fast-moving, and potentially visible at much lower latitudes.
The Best Nordic Windows for Photography
While the aurora is present during all dark months, the equinox periods of September-October and March are the undisputed sweet spots. During these months, the orientation of Earth’s magnetic field is most receptive to the solar wind, statistically increasing the frequency of strong auroral displays. Autumn offers a unique aesthetic advantage: the lakes and fjords have not yet frozen, providing mirror-still surfaces for capturing breathtaking reflections. This is the secret to creating images with profound depth and symmetry, an essential technique when you set out to photograph northern lights. The light quality also varies by region; the deep, pristine wilderness of Finnish Lapland offers crystal-clear, stable skies, while the rugged Icelandic coast provides a dramatic, untamed backdrop of volcanic rock and crashing waves, where the weather is as dynamic as the sky itself.
The Photographer’s Toolkit: Essential Gear for 2026
Capturing the ethereal dance of the aurora borealis is less about happenstance and more about preparation. The right equipment is your silent partner in the pristine Arctic wilderness, the bridge between a fleeting memory and a timeless image. As technology evolves, the tools at our disposal become ever more powerful. The question of how to photograph northern lights in 2026 is answered not with one perfect camera, but with a curated toolkit designed for the profound darkness and biting cold of the north.
Your foundation is stability. An unwavering, sturdy tripod is the single most critical piece of gear you will carry. In the face of sub-zero winds across a frozen fjord, a flimsy travel tripod will betray you with imperceptible vibrations, blurring the delicate cosmic ribbons into an indistinct smear. Paired with this is a remote shutter release or a camera with a built-in intervalometer. Pressing the shutter button manually, no matter how gently, introduces shake that will ruin a long exposure. These two items are non-negotiable.
To drink in the faint, otherworldly light, your lens must be both wide and fast. We recommend a lens with an aperture of f/2.8 or lower (such as f/1.8 or f/1.4). This wide opening allows your camera’s sensor to gather the maximum amount of light in the shortest time, revealing details and colors invisible to the naked eye. A wide-angle focal length, typically between 14mm and 24mm, is essential for capturing the sheer scale of the aurora as it sweeps across the vast, star-dusted sky.
DSLR and Mirrorless: The Professional Standard
Modern mirrorless cameras, particularly full-frame models, have revolutionized low-light photography with their astonishing high-ISO performance. A full-frame sensor, being physically larger than a crop sensor, can produce significantly cleaner images with less digital noise at ISO settings of 3200, 6400, or even higher. This is a decisive advantage in the deep dark of the Arctic. Our handpicked lens list for a full-frame camera consistently includes primes like a 14mm f/1.8 or a 20mm f/1.8, and versatile zooms like a 16-35mm f/2.8. Finally, remember that the Arctic cold is a thief of energy. Lithium-ion batteries can lose over 50% of their charge in freezing conditions. The solution is simple: carry at least three fully charged spares and keep them insulated in an interior pocket, close to your body heat. This simple discipline is a core tenet of our tailor-made photography journeys, ensuring you never miss the peak of the display.
Smartphone Photography: Capturing Magic on Mobile
Do not underestimate the power in your pocket. By 2026, the computational photography driving “Night Mode” on flagship smartphones has reached incredible heights, automatically stacking multiple exposures to create bright, detailed images. While the default camera app is powerful, third-party apps like Halide for iPhone or ProCam X for Android unlock full manual control over shutter speed and ISO. This allows you to apply the same principles of long-exposure photography used by professionals, a technique echoed in many expert photography tips from National Geographic. Even so, the laws of physics are absolute. To achieve a sharp, 5-to-10-second exposure with your phone, a small, dedicated mobile tripod is essential to eliminate hand-shake and capture the true magic of the night.
Mastering the Settings: A Blueprint for Crisp Aurora Shots
To truly capture the soul of the aurora, you must disconnect from your camera’s automation. The ethereal dance of the Northern Lights unfolds in a low-light world your camera’s auto mode simply cannot comprehend. Taking control is not a suggestion; it is the first step toward creating an image that mirrors the awe you feel standing beneath the pristine arctic sky. This is your guide on how to photograph northern lights by mastering the camera’s core functions.
The entire process revolves around the delicate balance of the exposure triangle: aperture, shutter speed, and ISO. Think of them as the three pillars supporting your final image.
- Aperture (f-stop): This is the opening in your lens. For the aurora, you need to gather as much light as possible. Set your lens to its widest aperture, which is the lowest f-number available, such as f/1.8 or f/2.8. This allows the faint, cosmic light to flood your sensor.
- Shutter Speed: This determines how long the sensor is exposed to light. A longer shutter speed captures more light and creates smooth, flowing ribbons of green. A shorter one freezes the motion, revealing intricate details and structures within a fast-moving aurora.
- ISO: This is your camera’s sensitivity to light. A higher ISO (like 3200) makes the sensor more sensitive, which is essential in the dark. However, it comes at a cost: digital noise, a grainy texture that can soften your image. The goal is to find the lowest ISO you can use while still achieving a proper exposure.
Focusing is perhaps the most common challenge in the profound darkness of the north. Your camera’s autofocus will hunt endlessly and fail. The solution is a time-honored technique: achieving infinity focus manually. Switch your lens to manual focus (MF). Turn on your camera’s Live View screen and digitally zoom in on the brightest, most distant star or the moon. Carefully turn the focus ring until that point of light is as small and sharp as possible. Once achieved, use a small piece of gaffer’s tape to secure the focus ring. Your lens is now set for the entire night.
Finally, a non-negotiable rule: shoot in RAW. A JPEG file is a compressed image where your camera has already made permanent decisions about color and brightness. A RAW file is the digital equivalent of a film negative. It contains all the unprocessed data from the sensor. A standard 8-bit JPEG records 256 levels of brightness, while a 14-bit RAW file captures 16,384 levels. This immense dynamic range is crucial for post-processing, allowing you to bring out faint details in the aurora and the foreground without losing quality.
The Golden Settings for Beginners
Feeling overwhelmed? Begin with this curated starting point and adjust from there. Set your camera to Manual Mode (M) with an ISO of 1600, an aperture of f/2.8, and a shutter speed of 10 seconds. If the aurora is dancing wildly, shorten your shutter speed to 3-5 seconds to freeze its structure. If it’s a faint, slow-moving arc, lengthen the exposure to 15-25 seconds to let its gentle glow burn into the sensor.
Advanced Techniques: Refining Your Craft
Once you are comfortable, you can refine your approach to achieving cleaner images. Your camera’s Long Exposure Noise Reduction (LENR) can help, but it works by taking a second, identical exposure with the shutter closed, effectively doubling your wait time. Turn it off when the aurora is active to avoid missing a spectacular moment. For the cleanest results, professionals often “stack” multiple images in software like Sequator, a process that averages out and digitally removes noise, yielding a pristine final photograph.
Beyond the Green: Composition and Storytelling
You have the technical settings dialled in. Your tripod is steady on the frozen earth. But the difference between a simple record of the aurora and a breathtaking photograph lies in the story you tell. Anyone can point a camera at the sky; the true art is in the composition. This is the quiet luxury of a well-composed shot, an image that whispers a tale of the untamed Arctic night rather than just shouting “green lights.” The aurora is the main character, but it needs a compelling stage to perform on.
Embrace the classic Rule of Thirds to create balance. Imagine your frame divided into a 3×3 grid. By placing the horizon along the bottom third, you give the ethereal dance of the aurora two-thirds of the frame, emphasizing its scale and majesty. Conversely, placing the horizon on the top third line grounds the image, drawing the eye to the rugged, snow-dusted landscape of the foreground and giving the sky a powerful context.
Don’t be afraid to incorporate a human element. A lone silhouette, perfectly still and gazing upward, provides an immediate sense of scale and wonder. It transforms a beautiful landscape photo into a relatable human experience, inviting the viewer to place themselves in that pristine, silent moment. This narrative touch is a vital step in mastering how to photograph northern lights in a way that resonates emotionally.
In the pristine wilderness of Finnish Lapland or along the dramatic fjords of Northern Norway, water becomes your second canvas. Capturing the aurora’s reflection in a glassy, ice-fringed lake doubles the magic. The perfect symmetry of the sky mirrored on the water’s surface creates a profound sense of peace and wonder, resulting in an image that is both complex and perfectly serene.
Foreground Interest: The Nordic Signature
A compelling foreground anchors the celestial display. In Finland, look for the unique Tykkylumi, heavy crown snow that turns ancient pines into surreal, white sculptures. Along Norway’s Lofoten coast, the iconic red rorbuer cabins provide a striking color contrast against the snow and green sky. For added depth, try light painting: a brief, 1-second sweep with a headlamp set below 15 lumens can gently illuminate details without overpowering the natural light.
Capturing the Ethereal Glow
On a clear, new-moon night in early autumn, you can frame both the Milky Way and the aurora in a single, awe-inspiring shot. But don’t discount the moon. While a full moon can overwhelm a faint aurora, a waxing or waning crescent is your greatest ally. The moon acts as a magnificent, natural “fill light” for the landscape, bathing the untamed mountains and silent forests in a soft, silver glow that your camera sensor will love.
Our handpicked locations are chosen for their pristine foregrounds and exceptionally dark skies. Let our expert guides lead you to the perfect frame on a tailor-made Northern Lights photography tour.
The Arctic Field Guide: Survival and Success
Capturing the ethereal dance of the aurora is more than a technical exercise; it’s an immersion into the untamed heart of the north. Your camera is only one part of the equation. True success lies in mastering the environment, respecting its power, and preparing with the precision of a seasoned explorer. The biting cold, the profound darkness, and the wild, open spaces demand your full attention. This is where the art of photography meets the craft of survival.
The pristine silence of an Arctic night is an unforgettable backdrop for the lights, but it presents unique challenges for both you and your delicate equipment. Preparation is not just a suggestion; it’s the foundation of a safe and rewarding expedition.
Protecting Your Gear and Yourself
Your ability to operate your camera in sub-zero temperatures is directly linked to your own comfort and safety. When your body is warm and your gear is protected, you can focus entirely on the celestial spectacle above. Think of these steps not as chores, but as rituals that enable creativity.
- The Art of Layering: Forget a single, bulky coat. The key to staying warm for hours is a three-layer system. Start with a merino wool base layer for moisture-wicking, add a fleece or down mid-layer for insulation, and finish with a windproof and waterproof outer shell. Insulated boots rated for at least -25°C (-13°F) and thermal socks are non-negotiable.
- The Ziploc Bag Trick: Condensation is the enemy of any lens. When moving from the extreme cold back into a warm vehicle or lodge, place your camera and lenses inside a large, sealable plastic bag before you go inside. This crucial step allows the equipment to warm up gradually. Any moisture will condense on the outside of the bag, not inside your camera body or between your lens elements.
- Essential Night Tools: Fumbling with buttons is impossible with thick mittens. Invest in photographer-specific gloves with removable fingertips. Equally vital is a headlamp with a red light mode. A sudden blast of white light can ruin your night-adjusted vision for up to 30 minutes and disrupt the long-exposure shots of everyone around you. The red light preserves your vision and shows respect for your fellow chasers.
Curated Experiences: Photography-Focused Tours
Your choice of guide can mean the difference between a fleeting glimpse from a crowded bus and an exclusive, soul-stirring encounter. A standard tourist trip might stop for fifteen minutes at a predictable viewpoint, but a true aurora hunt is a dynamic pursuit. It requires a guide who thinks like a photographer.
This is why a handpicked, photography-focused tour is invaluable. Unlike large-group excursions, these are mobile chases led by experts who understand the nuances of long-exposure work. They know that the secret to learning how to photograph northern lights is having the time and space to set up your tripod, compose your shot, and wait patiently for the magic to unfold. They seek out pristine, dark-sky locations far from the glow of city lights.
These bespoke expeditions use real-time meteorological and solar activity data to follow the clear sky, dramatically increasing your chances of a successful night. If a cloud bank moves in, the chase isn’t over; it simply relocates. This seamless, intelligent approach transforms the experience from a game of chance into a calculated, thrilling pursuit. For a deeper dive into planning your journey, our Seeing the Northern Lights: The Ultimate 2026 Guide offers a comprehensive overview.
Ultimately, photographing the aurora borealis is a holistic experience where preparation, patience, and expert guidance converge under a sky of impossible beauty. Let us handle the logistics, so you can focus on the wonder.
Explore our handpicked Nordic tours and begin your Arctic story.
Frame Your 2026 Arctic Masterpiece
The 2026 solar maximum presents a peak viewing opportunity unseen for over 11 years. You’re now equipped with the technical blueprint for this celestial event, from selecting a fast, wide-angle lens like a 14mm f/1.8 to mastering the 500 Rule for crisp, star-filled skies. Mastering the technical side of how to photograph northern lights is the first step; immersing yourself in the untamed beauty of the Arctic is the next.
Transforming this knowledge into a seamless reality requires more than a map. It demands our expert local knowledge to guide you to secluded viewing spots and a deep commitment to sustainability-focused travel that honors the pristine wilderness. Our exclusive, bespoke itineraries are built on these principles, ensuring every logistical detail is flawlessly handled so your focus remains on the viewfinder and the spectacle above.
The heavens are preparing for their most dramatic performance in a decade. Let us place you front and center. Begin your Arctic journey with our curated Nordic tours and capture the story written in the stars.
Frequently Asked Questions About Northern Lights Photography
Do I need a professional camera to photograph the Northern Lights in 2026?
No, you don’t strictly need a professional DSLR or mirrorless camera. High-end smartphones released since 2023, such as the iPhone 15 Pro or Samsung Galaxy S24 Ultra, feature advanced night modes and RAW capabilities that can capture the ethereal dance of the Aurora. For the most pristine, detailed images, however, a full-frame camera with a wide-aperture lens remains the superior choice, offering unparalleled control over the final, breathtaking shot.
What is the best shutter speed for the Northern Lights?
The ideal shutter speed depends entirely on the Aurora’s movement, a key detail when learning how to photograph Northern Lights. For a slow, gentle arc across the sky, a longer exposure of 15 to 25 seconds creates a smooth, silky effect. When the lights are dancing rapidly, a faster shutter speed between 2 and 8 seconds is necessary to capture their defined, curtain-like shapes. We recommend starting with a 15-second exposure and adjusting from there.
How do I focus my camera on the Aurora at night?
You must use manual focus, as autofocus systems will fail in the deep Nordic darkness. First, switch your lens to its manual focus (MF) setting. Then, use your camera’s live view screen and digitally zoom in on the brightest star or a distant light on the horizon. Carefully turn the focus ring until that point of light is a sharp, tiny pinprick. Once set, don’t touch the focus ring again for the rest of the night.
Can I see the Northern Lights with the naked eye if I can see them on my camera?
Yes, but the experience can be different. Your camera’s sensor, through long exposure, gathers more light than the human eye, often revealing vibrant greens and purples that might appear as faint, whitish-grey clouds to your unaided vision. During a strong geomagnetic storm, rated Kp 5 or higher on the planetary index, the colors become intensely vivid and are easily seen without any equipment, creating a truly unforgettable, multi-sensory spectacle.
How do I keep my camera batteries from dying in the Arctic cold?
Cold is the enemy of battery life, reducing a full charge by up to 50% in temperatures below -10°C (14°F). The key is to keep them warm. Carry at least two or three fully charged spare batteries and store them in an insulated inner pocket of your jacket, close to your body heat. Only swap a depleted battery for a warm one right before you need it. This simple technique ensures you won’t miss the peak of the celestial display.
What is the best month to photograph the Aurora in Scandinavia?
The prime Aurora season in Scandinavia runs from late September to early April, when the nights are long and profoundly dark. For the highest probability of clear skies combined with strong solar activity, many photographers favor the periods around the equinoxes. Specifically, the weeks from late September to mid-October and the entire month of March often provide an ideal balance of darkness, weather, and geomagnetic activity for a successful photographic expedition.
Is a tripod really necessary for Northern Lights photography?
Yes, a sturdy tripod is absolutely essential and non-negotiable. To capture the faint, ethereal light of the Aurora, you’ll use long shutter speeds, often between 5 and 25 seconds. Any camera movement during this time, even the slightest tremor from holding it, will result in a blurry, indistinct image. A solid tripod guarantees the razor-sharp focus needed to render the pristine details of the celestial dance against the rugged Nordic landscape.
What app should I use to track the Northern Lights?
For reliable, real-time Aurora forecasting, we recommend the My Aurora Forecast & Alerts app. It provides key data like the Kp-index, viewing probability, and cloud cover maps, sourcing its information directly from the NOAA Space Weather Prediction Center. Another excellent choice for our curated journeys is the SpaceWeatherLive app, which offers detailed solar wind data for those who want a deeper understanding of the science behind the spectacle.